home
digest archive
search
helpful links
mailing list
download recipes (1990-2001)
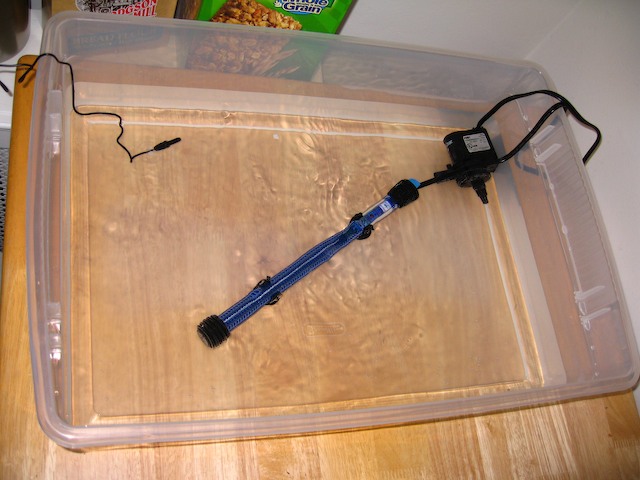
Build a water-bath proofing box
John Mulholland
provides this picture and directions:
I'm not sure if I'm the first to come up with this design but I thought it
was worth passing on. I'm an avid marine aquarist and I used this design
many years ago to cultivate rare wild mushrooms - it works great as an
incubator for anything. I've modified the design to proof bread -
works like a charm.
I've designed a proofing box that can be made at home with no tools
for less than $50.
Parts:
- Two clear plastic bins and a single lid. The under-the-bed style bins
that are about 6 inches deep are perfect. The bins should fit inside each
other with a gap of air about two inches between the two bottoms. Target has
a great bin selection. If you want enough room to fit tall/large mixing
bowls etc in the finished box, buy bins of the appropriate size - just make
sure they have a decent gap between the two bottoms - you'll see why
below...
- One SUBMERSIBLE aquarium heater (100W is plenty) - available at any
decent pet store (Petco etc) or online through any of the many online
aquarium supply houses.
- One thermometer - the aquarium-style adhesive types are great and cover
the temperature range needed for proofing perfectly (70-90 F).
- Optional: one small "powerhead" pump to circulate the water - not totally
necessary but the engineer in me included it in my final design. These are
small submersible pumps designed to circulate water within an aquarium - the
smaller the better as it must fit within the space between the two bins.
Assembly:
Fill one bin with enough water so that the second bin will just float when
placed inside it. Attach the submersible heater with its suction cups to the
bottom of the bin with the water (if the heater is "submersible" it's made
to go under water - don't worry!). If you opted to include the pump throw it
into the water and aim it so it pumps water around the perimeter of the bin.
Set the heater to whatever temperature you want by following the
instructions for the heater - some of the more expensive heaters are
pre-calibrated or have built-in digital thermostats - worth the extra
$10-15. Once you have the temp where you want it, float the dry bin inside
the first bin making sure to get all the air out so the heat transfer is
perfect. Now dough can be placed on a couche or board inside the dry bin,
covered with the bin lid and proofed at whatever temperature desired. The
inside of the proofing box can be misted with water to maintain high
humidity if so desired.